Playing With My PiHoles
Playing With My PiHoles#
Last weekend, the PiHole team dropped a major update – PiHole v6. This version completely re-architects the project. They’ve updated the web server, overhauled the APIs and interface, and added a few new features. It looks pretty solid on paper, but I’m not ready to roll it out on my production Raspberry Pis until I’m sure all the kinks are worked out. From what I’m seeing on Reddit, there’s still plenty to fix. That won’t stop me from tinkering, though.
How I Manage My Home DNS#
I run a home lab with a mix of bare-metal Linux servers and a Proxmox host where all my LXCs live. With so many devices and IPs, memorizing them isn’t an option. That’s why I use PiHole’s Local DNS to handle hostnames.
To date, I’ve been setting these records manually via the web interface. Here’s what I’m aiming for:
- A script I can run from my laptop that automatically provisions a new local CNAME or A record on both PiHoles at nearly the same time.
- A setup where one PiHole is primary and the other secondary, syncing changes automatically. Ideally, this sync would be idempotent so that no unnecessary changes are forced.
With all these API changes, it’s the perfect time to work on a strategy.
The PiHole API#
The updated API is actually pretty well-structured.
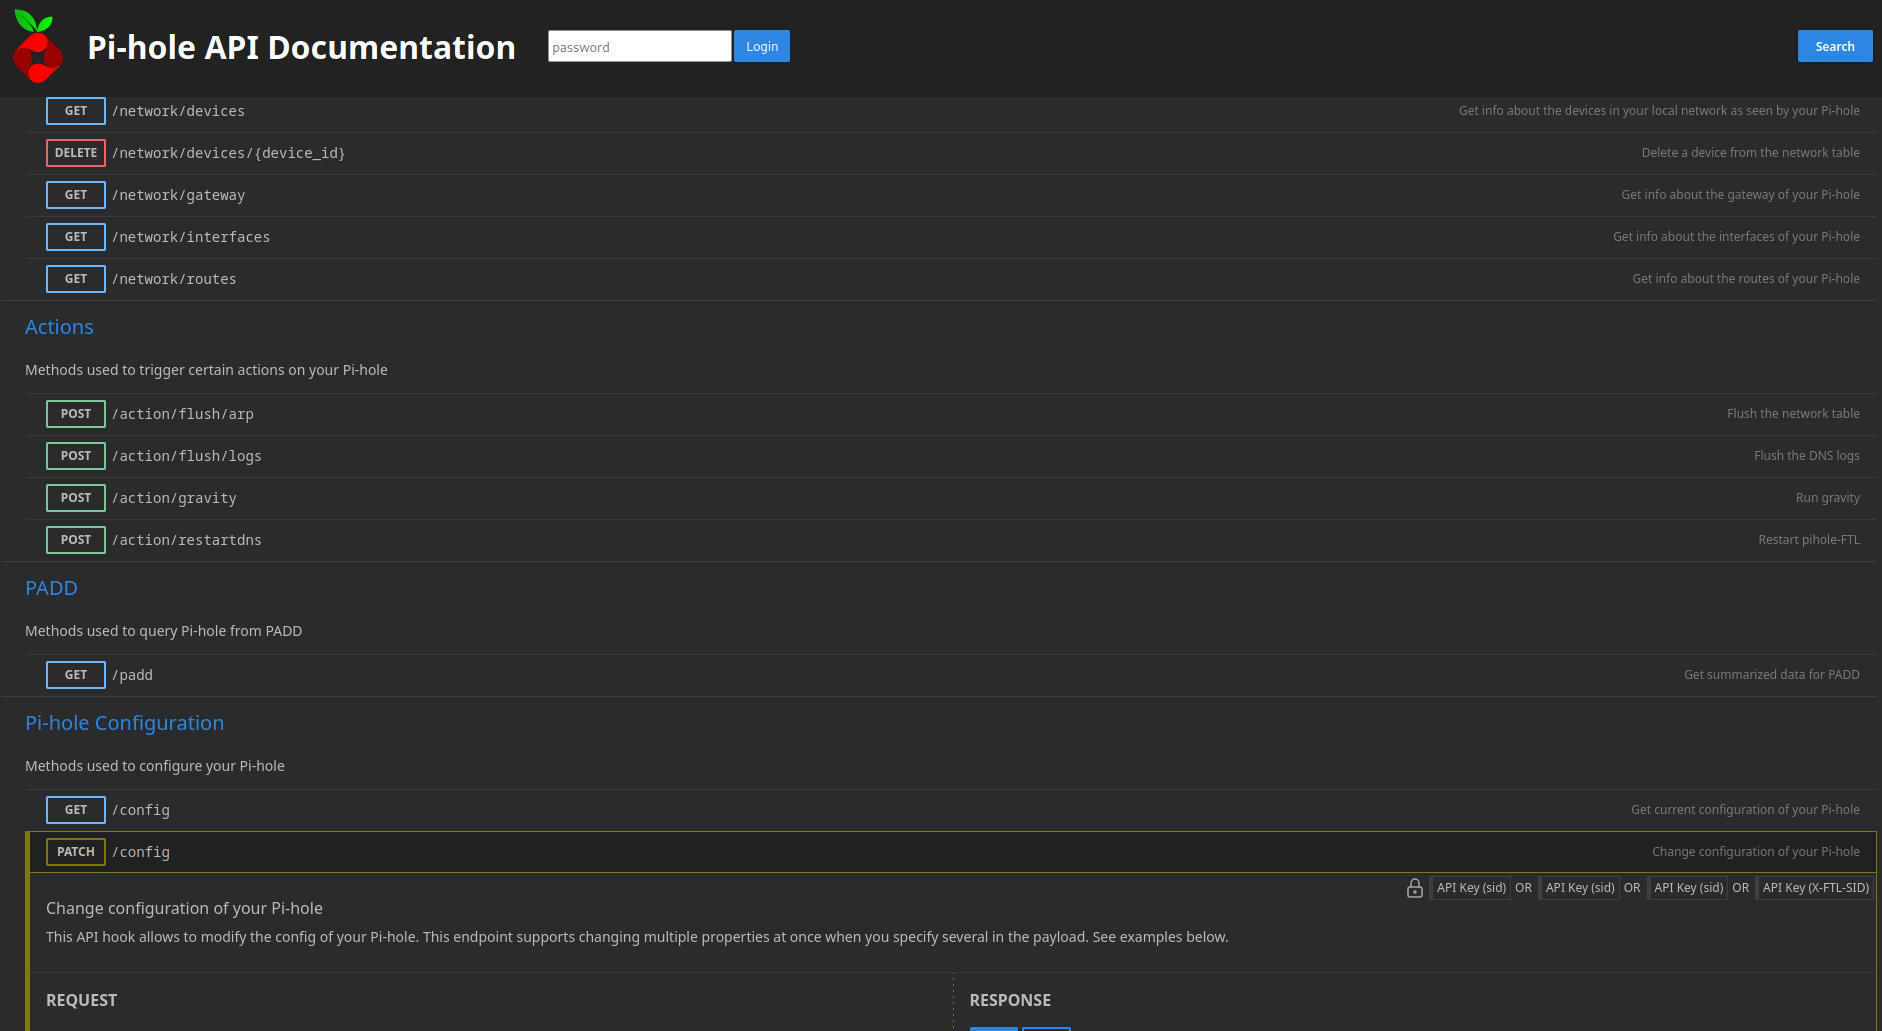
The configuration section was a bit confusing at first, but you get the hang of it. I plan to use Ansible to manage my setup, which means I need a way to handle connections to the API through a module.
Python SDK#
I decided to write a little SDK for the PiHole API. If you want to try it out, you can download it from PyPi:
pip install pihole6api
You can also check out the source code on GitHub. The client is built from two main components:
- The connection module: This handles authentication, stores the connection state and closes the session when you’re done.
- The client: This wraps all the API endpoints. The API is organized into submodules so that each section of the API is handled by a dedicated part of the client.
Usage#
Instantiate a Client:
Just pass your PiHole URL and password into the constructor:
from pihole6api import PiHole6Client
client = PiHole6Client("https://test-pihole.example.me", "correct horse battery staple")
Submodules:
The client is split into submodules based on the API documentation. If you’re working in the CLI, a quick way to see what methods are available is by using the dir() function:
print(dir(client))
This will list all the object’s properties (the ones that start and end with __ are Python’s magic methods).
[
   "__class__",
   "...",
   "__weakref__",
   "actions",
   "client_management",
   "close_session",
   "config",
   "connection",
   "dhcp",
   "dns_control",
   "domain_management",
   "ftl_info",
   "get_padd_summary",
   "group_management",
   "list_management",
   "metrics",
   "network_info"
]
To inspect a specific submodule, try:
print(dir(client.metrics))
This will show you the available methods in the metrics submodule.
[
   "...",
   "connection",
   "get_history",
   "get_history_clients",
   "get_history_database",
   "get_history_database_clients",
   "get_queries",
   "get_query_suggestions",
   "get_stats_database_query_types",
   "get_stats_database_summary",
   "get_stats_database_top_clients",
   "get_stats_database_top_domains",
   "get_stats_database_upstreams",
   "get_stats_query_types",
   "get_stats_recent_blocked",
   "get_stats_summary",
   "get_stats_top_clients",
   "get_stats_top_domains",
   "get_stats_upstreams"
]
View Queries:
As a simple test, you can view some queries with:
print(client.metrics.get_queries())
This call returns a dictionary with your query data. For example:
{
   "cursor": 14,
   "draw": 0,
   "queries": [
      {
         "client": {
            "ip": "127.0.0.1",
            "name": "localhost"
         },
         "cname": null,
         "dnssec": "UNKNOWN",
         "domain": "1.0.0.127.in-addr.arpa",
         "ede": {
            "code": -1,
            "text": null
         },
         "id": 14,
         "list_id": null,
         "reply": {
            "time": 0.00006198883056640625,
            "type": "DOMAIN"
         },
         "status": "CACHE",
         "time": 1740790800.3022587,
         "type": "PTR",
         "upstream": null
      },
      {
         "client": {
            "ip": "127.0.0.1",
            "name": "localhost"
         },
         "cname": null,
         "dnssec": "UNKNOWN",
         "domain": "211.1.168.192.in-addr.arpa",
         "ede": {
            "code": -1,
            "text": null
         },
         "id": 13,
         "list_id": null,
         "reply": {
            "time": 0.0000133514404296875,
            "type": "NXDOMAIN"
         },
         "status": "CACHE",
         "time": 1740787200.5384429,
         "type": "PTR",
         "upstream": null
      },
      {"...":"..."}
   ],
   "recordsFiltered": 14,
   "recordsTotal": 14,
   "took": 0.00010728836059570312
}
That’s the basic rundown of the Python SDK. From here, you can explore the other submodules to see how the client handles different parts of the API.
Making a Collection of Ansible Modules#
You can check out my full Ansible collection on GitHub.
Now that all the API endpoints are wrapped in a Python client, we can plug that into Ansible modules. To get started, I created the basic structure of an Ansible collection with:
ansible collection init namespace.collection_name
This will generated a directory structure like this:
current_directory
L namespace/
L L collection_name/
L L L docs/
L L L meta/
L L L plugins/
L L L roles/
L L L README.md
L L L galaxy.yml
Inside the plugins/ directory, I created a folder called modules/ where I put my module files.
Writing a Module#
A substantial portion of the module code is documentation.
#!/usr/bin/python
# -*- coding: utf-8 -*-

from ansible.module_utils.basic import AnsibleModule
try:
    from pihole6api import PiHole6Client
except ImportError:
    raise ImportError("The 'pihole6api' Python module is required. Run 'pip install pihole6api' to install it.")

DOCUMENTATION = r'''
---
module: local_a_record
short_description: Manage Pi-hole local A records via pihole v6 API.
description:
    - This module adds or removes local A records on a Pi-hole instance using the piholev6api Python client.
options:
    host:
        description:
            - The hostname for the A record.
        required: true
        type: str
    ip:
        description:
            - The IP address to associate with the hostname.
        required: true
        type: str
    state:
        description:
            - Whether the A record should be present or absent.
        required: true
        type: str
        choices: ['present', 'absent']
    password:
        description:
            - The API password for the Pi-hole instance.
        required: true
        type: str
        no_log: true
    url:
        description:
            - The URL of the Pi-hole instance.
        required: true
        type: str
author:
    - Shane Barbetta (@sbarbett)
'''

EXAMPLES = r'''
- name: Create test.example.com A record
  sbarbett.pihole.local_a_record:
    host: test.example.com
    ip: 127.0.0.1
    state: present
    url: "https://your-pihole.example.com"
    password: "{{ pihole_password }}"

- name: Delete test.example.com A record
  sbarbett.pihole.local_a_record:
    host: test.example.com
    ip: 127.0.0.1
    state: absent
    url: "https://your-pihole.example.com"
    password: "{{ pihole_password }}"
'''

RETURN = r'''
result:
    description: The API response from the Pi-hole server.
    type: dict
    returned: always
changed:
    description: Whether any change was made.
    type: bool
    returned: always
'''
This module lets you create or delete an A record on your PiHole by simply setting the state to present or absent. It checks whether a record already exists and ensures changes are only made when necessary.
def run_module():
    module_args = dict(
        host=dict(type='str', required=True),
        ip=dict(type='str', required=True),
        state=dict(type='str', choices=['present', 'absent'], required=True),
        password=dict(type='str', required=True, no_log=True),
        url=dict(type='str', required=True)
    )

    result = dict(
        changed=False,
        result={}
    )

    module = AnsibleModule(
        argument_spec=module_args,
        supports_check_mode=True
    )

    host = module.params['host']
    ip = module.params['ip']
    state = module.params['state']
    password = module.params['password']
    url = module.params['url']

    if module.check_mode:
        module.exit_json(**result)

    try:
        client = PiHole6Client(url, password)
        current_config = client.config.get_config_section("dns/hosts")
        hosts_list = current_config.get("config", {}).get("dns", {}).get("hosts", [])

        existing_ip = None
        for entry in hosts_list:
            parts = entry.split(None, 1)  # expected format: "ip host"
            if len(parts) == 2 and parts[1] == host:
                existing_ip = parts[0]
                break

        if state == 'present':
            if existing_ip is None:
                # No record exists; add the new one.
                add_response = client.config.add_local_a_record(host, ip)
                result['changed'] = True
                result['result'] = add_response
            elif existing_ip != ip:
                # A record exists but with a different IP; remove it first.
                remove_response = client.config.remove_local_a_record(host, existing_ip)
                add_response = client.config.add_local_a_record(host, ip)
                result['changed'] = True
                result['result'] = {'removed': remove_response, 'added': add_response}
            else:
                result['changed'] = False
                result['result'] = {"msg": "Record already exists with the desired IP", "current": current_config}

        elif state == 'absent':
            if existing_ip is not None:
                remove_response = client.config.remove_local_a_record(host, existing_ip)
                result['changed'] = True
                result['result'] = remove_response
            else:
                result['changed'] = False
                result['result'] = {"msg": "Record does not exist", "current": current_config}

        module.exit_json(**result)

    except Exception as e:
        module.fail_json(msg=f"Error managing local A record: {e}", **result)
    finally:
        if client is not None:
            client.close_session()
An important note regarding the PiHole API and active “sessions”: There are only a limited number of “seats” available for sessions. You must close or delete your sessions once you’re finished with them. If you don’t, especially when running things in Ansible, orphaned sessions can quickly accumulate, and eventually your PiHole will lock you out due to too many active sessions.
Writing a Playbook#
You can call a module from within a playbook like this:
---
- name: Create test.example.com A record
  hosts: localhost
  gather_facts: false
  tasks:
    - name: Create test.example.com A record
      sbarbett.pihole.local_a_record:
        host: test.example.com
        ip: 127.0.0.2
        state: present
        url: "https://your-pihole.example.com"
        password: "{{ pihole_password }}"
And to delete the record:
---
- name: Delete test.example.com A record
  hosts: localhost
  gather_facts: false
  tasks:
    - name: Delete test.example.com A record
      sbarbett.pihole.local_a_record:
        host: test.example.com
        ip: 127.0.0.1
        state: absent
        url: "https://your-pihole.example.com"
        password: "{{ pihole_password }}"
Adding Modules to a Role#
Keep your modules simple and focused. If you need to handle more complex configurations, break the task into individual modules and then combine them into a role. For example, if you want to define all your A records and CNAMEs in one manifest and deploy that DNS configuration to multiple PiHoles, your manifest might look like this:
---
- name: Manage Pi-hole local records
  hosts: localhost
  gather_facts: false
  roles:
    - role: sbarbett.pihole.manage_local_records
      vars:
        pihole_hosts:
          - name: "https://your-pihole-1.example.com"
            password: "{{ pihole_password }}"
          - name: "https://your-pihole-2.example.com"
            password: "{{ pihole_password }}"
        pihole_records:
          - name: dummy1.xyz
            type: A
            data: 192.168.1.1
            state: absent
          - name: dummy2.xyz
            type: CNAME
            data: dummy1.xyz
            state: absent
          - name: dummy3.xyz
            type: A
            data: 127.0.0.1
            state: absent
          - name: dummy4.xyz
            type: CNAME
            data: dummy2.xyz
            ttl: 900
            state: absent
From the root of my collection, I created a basic role structure using:
ansible-galaxy init roles/role_name
Then I added my workflow logic into the tasks/ directory. In main.yml:
---
- name: Process each Pi-hole instance
  include_tasks: process_instance.yml
  loop: "{{ pihole_hosts }}"
  loop_control:
    loop_var: pihole_instance
This tells the role to loop through the list of hosts and run the process_instance.yml task. In process_instance.yml:
---
- name: Process each record on {{ pihole_instance.name }}
  include_tasks: process_record.yml
  loop: "{{ pihole_records }}"
  loop_control:
    loop_var: record
This loops through each record in the list and runs the process_record.yml task. Finally, in process_record.yml:
---
- name: Process record {{ record.name }} on {{ pihole_instance.name }}
  block:
    - name: Manage A record on {{ pihole_instance.name }}
      sbarbett.pihole.local_a_record:
        host: "{{ record.name }}"
        ip: "{{ record.data }}"
        state: "{{ record.state }}"
        url: "{{ pihole_instance.name }}"
        password: "{{ pihole_instance.password }}"
      when: record.type == "A"

    - name: Manage CNAME record on {{ pihole_instance.name }}
      sbarbett.pihole.local_cname:
        host: "{{ record.name }}"
        target: "{{ record.data }}"
        ttl: "{{ record.ttl | default(300) }}"
        state: "{{ record.state }}"
        url: "{{ pihole_instance.name }}"
        password: "{{ pihole_instance.password }}"
      when: record.type == "CNAME"

    - name: Pause for 1 second
      command: sleep 1
      changed_when: false
      no_log: true
In this final task file, the role handles creating an A record or a CNAME, based on the record type, and then pauses for a second to avoid overloading the PiHole and triggering any rate limits.
Proxmox Role#
I added a flag to the docker_compose role in my Proxmox collection that automatically installs PiHole and Unbound together, with Unbound set up as the upstream resolver.
Tying It All Together#
To set up Ansible in a self-contained virtual environment, use this shell script:
#!/bin/bash

set -e  # Exit on error

# Define directories
BASE_DIR="$(pwd)"
SECRETS_DIR="$HOME/.secrets"
TIMESTAMP=$(date +%s)
VAULT_PASSWORD_FILE="$SECRETS_DIR/.vault-password-$TIMESTAMP"
ANSIBLE_CFG="$BASE_DIR/ansible.cfg"
INVENTORY_FILE="$BASE_DIR/hosts"
VAULT_FILE="$BASE_DIR/group_vars/test_servers/vault"

# Create sandbox environment
mkdir -p "$BASE_DIR"
cd "$BASE_DIR"

# Set up Python virtual environment
python3 -m venv venv
source venv/bin/activate
pip install --upgrade pip
pip install ansible requests pihole6api proxmoxer passlib

# Verify installation
ansible --version
ansible-community --version
which ansible
which python
PYTHON_BIN=$(which python)

# Initialize ansible.cfg
ansible-config init --disabled > "$ANSIBLE_CFG"

# Update ansible.cfg
sed -i "s|;vault_password_file=.*|vault_password_file=$VAULT_PASSWORD_FILE|" "$ANSIBLE_CFG"
sed -i "s|;inventory=.*|inventory=hosts|" "$ANSIBLE_CFG"
sed -i 's|;roles_path=.*|roles_path=roles|' "$ANSIBLE_CFG"
sed -i 's|;collections_path=.*|collections_path=collections|' "$ANSIBLE_CFG"
sed -i 's|;host_key_checking=True|host_key_checking=False|' "$ANSIBLE_CFG"
sed -i 's|;stdout_callback=.*|stdout_callback=unixy|' "$ANSIBLE_CFG"
sed -i 's|;vault_password_file=.*|vault_password_file=$VAULT_PASSWORD_FILE|' "$ANSIBLE_CFG"

# Create necessary directories and files
mkdir -p "$BASE_DIR/roles" "$BASE_DIR/collections" "$BASE_DIR/group_vars/test_servers"
echo -e "[test_servers]\nlocalhost ansible_connection=local ansible_python_interpreter=$PYTHON_BIN" > "$INVENTORY_FILE"

# Set up secrets directory
mkdir -p "$SECRETS_DIR"
chmod 700 "$SECRETS_DIR"

# Prompt for vault password
while true; do
    echo "Enter a password for the Ansible Vault: "
    read -s VAULT_PASS1
    echo "Confirm the password: "
    read -s VAULT_PASS2

    if [ "$VAULT_PASS1" == "$VAULT_PASS2" ]; then
        VAULT_PASS="$VAULT_PASS1"
        break
    else
        echo "Passwords do not match. Please try again."
    fi
done

echo "$VAULT_PASS" > "$VAULT_PASSWORD_FILE"
chmod 600 "$VAULT_PASSWORD_FILE"

# Reload vault password file to ensure it's available
export ANSIBLE_VAULT_PASSWORD_FILE="$VAULT_PASSWORD_FILE"

# Prompt for sensitive values
declare -A secrets
secrets[proxmox_api_host]=""
secrets[proxmox_api_user]=""
secrets[proxmox_node]=""
secrets[proxmox_api_id]=""
secrets[proxmox_api_secret]=""
secrets[pihole_password]=""

for key in "${!secrets[@]}"; do
    echo -n "Enter value for $key: "
    read value
    secrets[$key]=$value
    echo "$key set to: ${secrets[$key]}"
done

# Create vault file
cat <<EOF > "$VAULT_FILE"
$(for key in "${!secrets[@]}"; do echo "$key: \"${secrets[$key]}\""; done)
EOF

# Encrypt vault file and verify encryption success
ansible-vault encrypt "$VAULT_FILE"
if [[ $? -ne 0 ]]; then
    echo "Vault encryption failed! Exiting."
    exit 1
fi

# Verify setup
ansible test_servers -m ping

# Install required Ansible collections and roles
ansible-galaxy collection install sbarbett.proxmox_management
ansible-galaxy collection install sbarbett.pihole
ansible-galaxy role install geerlingguy.docker
ansible-galaxy collection install community.general --upgrade

echo "Ansible test environment setup complete!"
Usage#
Create a directory for your Ansible environment, e.g.,
mkdir ~/ansible-test.Save the script above as
setup.sh.Make it executable:
chmod +x setup.shRun the script:
./setup.sh
This sets up a virtual environment, installs Ansible and dependencies, creates your inventory and configuration files, and sets up your vault.
Playbook and Variables#
Define your LXC settings in group_vars/test_servers/vars.yml:
lxcs:
  - vmid: 136
    hostname: auto-pihole-test
    ostemplate: "local:vztmpl/debian-12-standard_12.7-1_amd64.tar.zst"
    storage: "local-lvm"
    cores: 1
    memory: 1024
    swap: 512
    disk: "local-lvm:25"
    net: "name=eth0,bridge=vmbr0,ip=dhcp"
    password: "containerpassword"
    onboot: true
    pubkey_file: "~/.ssh/nuc_rsa.pub"
    features: "nesting=1"
    # Additional configuration
    config:
      username: demo
      user_password: "demo"
      private_key: "~/.ssh/nuc_rsa"
      wait_for_status: true
      initial_setup: true
      install_extras: true
      install_docker: true
      docker_containers:
        pihole-unbound:
          pihole_web_api_password: "{{ pihole_password }}"
Adjust these values to suit your needs and environment. Next, create a directory called playbooks and a file named pihole-setup.yml. This playbook provisions the LXC and sets up Pi-hole:
---
- name: Provision Proxmox LXC containers
  hosts: localhost
  connection: local
  gather_facts: no
  tasks:
    - name: Run proxmox_provision role for each container
      include_role:
        name: sbarbett.proxmox_management.proxmox_provision
      vars:
        container: "{{ item }}"
      loop: "{{ lxcs }}"

- name: Populate dynamic inventory with container hosts
  hosts: localhost
  connection: local
  gather_facts: no
  tasks:
    - name: Run container_setup inventory tasks for each container
      include_role:
        name: sbarbett.proxmox_management.container_inventory
        tasks_from: inventory.yml
      vars:
        container: "{{ item }}"
      loop: "{{ lxcs }}"

- name: Run initial container setup
  hosts: proxmox_containers
  gather_facts: no
  become: yes
  roles:
    - role: sbarbett.proxmox_management.container_setup

- name: Run extras configuration on containers
  hosts: proxmox_containers_extras
  gather_facts: yes
  become: yes
  roles:
    - role: sbarbett.proxmox_management.container_extras

- name: Run docker setup on provisioned containers
  hosts: proxmox_containers_docker
  gather_facts: yes
  roles:
    - role: geerlingguy.docker
      vars:
        docker_edition: 'ce'
        docker_service_state: started
        docker_service_enabled: true
        docker_packages:
          - "docker-{{ docker_edition }}"
          - "docker-{{ docker_edition }}-cli"
          - "docker-{{ docker_edition }}-rootless-extras"
        docker_packages_state: present
        docker_install_compose_plugin: true
        docker_compose_package: docker-compose-plugin
        docker_compose_package_state: present
        docker_users:
          - "{{ container.config.username }}"

- name: Run docker container setup on provisioned containers
  hosts: proxmox_containers_docker
  gather_facts: yes
  become: yes
  roles:
    - role: sbarbett.proxmox_management.docker_compose

- name: Change the PiHole listening mode
  hosts: proxmox_containers_docker
  gather_facts: false
  tasks:
    - name: Load PiHole password from localhost
      set_fact:
        pihole_password: "{{ hostvars['localhost']['pihole_password'] }}"
      delegate_to: localhost

    - name: Change the PiHole listening mode
      delegate_to: localhost
      run_once: false
      sbarbett.pihole.listening_mode:
        mode: "all"
        url: "http://{{ hostvars[inventory_hostname].ansible_host }}:80"
        password: "{{ pihole_password }}"
Run the playbook with:
ansible-playbook playbooks/pihole-setup.yml
Test#
After the playbook completes, test your server’s DNS resolution:
dig @{ip_address} google.com +short
If successful, you should see an IP address returned. Also, check that the web interface is available at http://{ip_address}/admin.
Your server should also be accessible via SSH using your private key.
Closing#
I shared this collection and client on the PiHole subreddit here and here, aand the feedback was great. If there are specific automations you’d like to see added to the roles, feel free to reach out here. Good luck out there.