Ansible Playbooks for Proxmox and LXCs Part 1
Ansible Playbooks for Proxmox and LXCs - Part 1#
Over the past week, I’ve been tinkering with Ansible at work, and it got me thinking about how I can use this tool to make life easier in my homelab. Ansible is a way of turning tasks that usually require a bunch of complicated scripting into something more straightforward. Additionally, with collections, you can integrate directly with APIs without having to reinvent the wheel.
In my homelab, I run a Proxmox server where I deploy Debian-based VMs. Every time I create a new VM, there’s an initial setup process that I’ve traditionally handled with a series of shell scripts. These tasks include:
- Updating the repository cache and upgrading packages.
- Creating a non-root user, adding them to sudo (and installing sudo on Debian 12), enabling pubkey authentication while disabling password-based logins, and locking down root SSH access.
- Automatically retrieving the container’s IP address for easy identification and management.
While these scripts have worked well, I want to streamline the process further by automating not just the in-VM configuration but also the provisioning of the VM itself on Proxmox. Additionally, I’m planning to modularize my setup by creating separate playbooks for tasks like Docker installation and custom MOTD configuration.
Setting Up Ansible#
I install ansible using pip inside a Python virtual environment (venv). This isn’t the only way to install Ansible, but I like to keep everything contained.
mkdir ~/ansible && cd ~/ansible
python3 -m venv venv
source venv/bin/activate
pip3 install ansible
After installation, verify it worked correctly:
ansible --version
Create an Inventory File#
Create a simple inventory file that defines localhost as your managed host:
echo -e "[test_servers]\nlocalhost ansible_connection=local" > ~/ansible/inventory
Test Connectivity#
Run the following command to verify that Ansible can communicate with your host:
ansible -i ~/ansible/inventory test_servers -m ping
Expected Output#
  ❯❯ /home/demo/ansible : ansible -i ~/ansible/inventory test_servers -m ping
[WARNING]: Platform linux on host localhost is using the discovered Python interpreter at /home/demo/ansible/venv/bin/python3.13, but future installation of another Python interpreter
could change the meaning of that path. See https://docs.ansible.com/ansible-core/2.18/reference_appendices/interpreter_discovery.html for more information.
localhost | SUCCESS => {
    "ansible_facts": {
        "discovered_interpreter_python": "/home/demo/ansible/venv/bin/python3.13"
    },
    "changed": false,
    "ping": "pong"
}
Python Interpreter Warning#
You might see a warning about the discovered Python interpreter. To suppress this warning, you can explicitly set the path to your interpreter in your inventory file. Just add these lines:
[all:vars]
ansible_python_interpreter=/home/demo/ansible/venv/bin/python3.13
Remember, your username and the Python version in your virtual environment might differ from mine. Use the absolute path shown as discovered_interpreter_python in your output.
Expected Output (After Updating the Inventory)#
  ❯❯ /home/demo/ansible : ansible -i ~/ansible/inventory test_servers -m ping
localhost | SUCCESS => {
    "changed": false,
    "ping": "pong"
}
Basics of Creating a Proxmox LXC Using Ansible#
Create a Proxmox API Token#
While it’s technically possible to authenticate with your Proxmox instance using your username and password, that’s not a best practice. Instead, create an API token:
- Log in to your Proxmox web console
- Go to Datacenter, then under Permissions, select API Tokens
- Click Add and give your token an appropriate ID (e.g.
ansible)
I won’t get too deep into how to scope the key with permissions—this guide focuses on using Ansible, not the broader nuances of Proxmox administration.
Create a Vault#
I recommend storing your API token inside an Ansible vault for security. This step is optional but strongly advised.
Run:
ansible-vault create proxmox-vault.yml
Give your vault a password then, when the text editor opens, add the following lines:
proxmox_api_user: "user@pam"
proxmox_api_id: "ansible"
proxmox_api_secret: "your-token-secret"
Here, user is the Proxmox account associated with your token (this could be root if that’s what you’re using), and ansible is the token ID you set. The secret is your actual API token.
Once you’re done editing, save and exit. Your credentials are now encrypted and saved to proxmox-vault.yml.
To keep your project organized, create a folder called vars and move the vault file into it:
mkdir vars && mv proxmox-vault.yml vars/
Storing Vault Password#
If you don’t want to type --ask-vault-password every time you run a playbook—or if you’re planning to automate these playbooks—you can store your vault password in a local file (make sure it’s protected with appropriate Linux permissions):
echo "your_vault_password_here" > ~/ansible/vars/.proxmox-vault-pass
chmod 600 ~/ansible/vars/.proxmox-vault-pass
When running your playbook, pass the vault password file using the --vault-password-file flag.
Install Python Dependencies#
The Proxmox community modules require requests and proxmoxer. In your ~/ansible directory, save the following content as bootstrap.yml:
---
- name: Bootstrap dependencies
  hosts: localhost
  connection: local
  gather_facts: no
  tasks:
    - name: Install required Python libraries
      ansible.builtin.pip:
        name:
          - proxmoxer
          - requests
        state: present
Run the playbook with this command:
ansible-playbook -i inventory bootstrap.yml
Expected Output#
PLAY [Bootstrap dependencies] ************************************************************************************************************************************************************

TASK [Install required Python libraries] *************************************************************************************************************************************************
changed: [localhost]

PLAY RECAP *******************************************************************************************************************************************************************************
localhost                  : ok=1    changed=1    unreachable=0    failed=0    skipped=0    rescued=0    ignored=0
Tip: If you want Ansible to be more verbose, you can add the -v, -vv or -vvv flags.
Creating a Role#
I want to keep my tasks modular and reusable across multiple LXCs. Setting up a role takes a bit more work up front, but it’s definitely worthwhile in the long run. First, create a directory called roles (if it doesn’t already exist) and initialize a new role:
mkdir roles && ansible-galaxy init roles/proxmox_lxc
This command automatically creates the file structure needed for your new role. Next, create an ansible.cfg file in your project’s root (e.g. ~/ansible) and add the following lines:
[defaults]
inventory = inventory
roles_path = roles
This configuration tells Ansible where to find your inventory and roles.
Create LXC Task#
Now, create a new file called roles/proxmox_lxc/tasks/create.yml and add the following content:
---
# roles/proxmox_lxc/tasks/create.yml

- name: Create LXC container on Proxmox
  community.general.proxmox:
    api_host: "{{ proxmox_api_host }}"
    api_user: "{{ proxmox_api_user }}"
    api_token_id: "{{ proxmox_api_id }}"
    api_token_secret: "{{ proxmox_api_secret }}"
    node: "{{ proxmox_node }}"
    vmid: "{{ container.vmid }}"
    hostname: "{{ container.hostname }}"
    ostemplate: "{{ container.ostemplate }}"
    storage: "{{ container.storage }}"
    cores: "{{ container.cores }}"
    memory: "{{ container.memory }}"
    swap: "{{ container.swap }}"
    disk: "{{ container.disk }}"
    netif: '{"net0": "{{ container.net }}"}'
    password: "{{ container.password }}"
    state: present
This file serves as the basic scaffold for creating a new LXC container. Roles are designed to be agnostic of the overall play structure—they assume that the necessary variables will be passed in through the playbook or defaults.
Next, update the role’s main task file so it knows when to run the creation task. Edit roles/proxmox_lxc/tasks/main.yml to include:
- name: Run creation tasks if state is present
  include_tasks: create.yml
  when: container.state == 'present'
This means that when the state of the container is set to present, the role will execute the tasks defined in create.yml to create the LXC.
Default Variables#
Under roles/proxmox_lxc/defaults/main.yml, add default variables for your Proxmox server hostname and node name. These defaults can be overridden in your playbook if needed:
# Default Proxmox settings
proxmox_api_host: "proxmox.example.com"
proxmox_node: "pve"
Create a Playbook#
Create a directory called playbooks (if it doesn’t already exist) and then create a new file inside it called manage-lxcs.yml:
mkdir playbooks && touch playbooks/manage-lxcs.yml
Edit playbooks/manage-lxcs.yml and add the following content:
---
- name: Manage Proxmox LXC containers
  hosts: localhost
  connection: local
  gather_facts: no

  vars_files:
    - ../vars/proxmox-vault.yml

  # Define a list of containers
  vars:
    lxcs:
      - vmid: 110
        hostname: test01
        # Your OS template for the LXC
        ostemplate: "local:vztmpl/debian-12-standard_12.7-1_amd64.tar.zst"
        storage: "local-lvm" # Storage volume
        cores: 1             # Number of vCPU cores
        memory: 1024         # Memory in MB
        swap: 512            # Swap in MB
        disk: "local-lvm:25" # Storage volume name and size in GB
        net: "name=eth0,bridge=vmbr0,ip=dhcp"
        password: "containerpassword"
        state: present

  tasks:
    - name: Process each LXC container
      include_role:
        name: proxmox_lxc
      loop: "{{ lxcs }}"
      loop_control:
        loop_var: container
In this playbook:
- Your API credentials are loaded from the vault file.
- A list of container definitions is provided under the
lxcsvariable. - The playbook loops over each container definition and applies the
proxmox_lxcrole to each one, passing the container details via the variablecontainer.
Now run your playbook with:
ansible-playbook --vault-password-file vars/.proxmox-vault-pass playbooks/manage-lxcs.yml
If everything was configured correctly up to this point, you should see output similar to:
PLAY [Manage Proxmox LXC containers] *****************************************************************************************************************************************************

TASK [Process each LXC container] ********************************************************************************************************************************************************
included: proxmox_lxc for localhost => (item={'vmid': 110, 'hostname': 'test01', 'ostemplate': 'local:vztmpl/debian-12-standard_12.7-1_amd64.tar.zst', 'storage': 'local-lvm', 'cores': 1, 'memory': 1024, 'swap': 512, 'disk': 'local-lvm:25', 'net': 'name=eth0,bridge=vmbr0,ip=dhcp', 'password': 'containerpassword', 'state': 'present'})

TASK [proxmox_lxc : Run creation tasks if state is present] ******************************************************************************************************************************
included: /home/demo/ansible/roles/proxmox_lxc/tasks/create.yml for localhost

TASK [proxmox_lxc : Create LXC container on Proxmox] *************************************************************************************************************************************
changed: [localhost]

PLAY RECAP *******************************************************************************************************************************************************************************
localhost                  : ok=3    changed=1    unreachable=0    failed=0    skipped=0    rescued=0    ignored=0
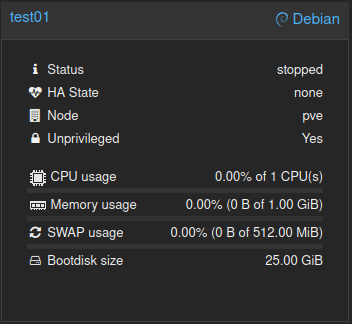
Check your Proxmox interface to confirm the container has been created:
Adding a Delete Task#
To allow our playbook to both create and delete LXCs based on the defined state, we need to add a delete task to our role. First, create another new file in roles/proxmox_lxc/tasks/ called delete.yml and add the following content:
---
# roles/proxmox_lxc/tasks/delete.yml

- name: Delete LXC container on Proxmox
  community.general.proxmox:
    api_host: "{{ proxmox_api_host }}"
    api_user: "{{ proxmox_api_user }}"
    api_token_id: "{{ proxmox_api_id }}"
    api_token_secret: "{{ proxmox_api_secret }}"
    node: "{{ proxmox_node }}"
    vmid: "{{ container.vmid }}"
    state: absent
Next, update your role’s main tasks file to include the deletion tasks when the container state is set to ‘absent’. Edit roles/proxmox_lxc/tasks/main.yml and add the following line:
- name: Run deletion tasks if state is absent
  include_tasks: delete.yml
  when: container.state == 'absent'
Now let’s modify our playbook (playbooks/manage-lxcs.yml) to test both creation and deletion. Update it so that it defines a list of containers with varying states:
  # Define a list of containers
  vars:
    lxcs:
      - vmid: 110
        hostname: test01
        # Your OS template for the LXC
        ostemplate: "local:vztmpl/debian-12-standard_12.7-1_amd64.tar.zst"
        storage: "local-lvm" # Storage volume
        cores: 1             # Number of vCPU cores
        memory: 1024         # Memory in MB
        swap: 512            # Swap in MB
        disk: "local-lvm:25" # Storage volume name and size in GB
        net: "name=eth0,bridge=vmbr0,ip=dhcp"
        password: "containerpassword"
        state: absent # Remove the container
      - vmid: 111
        hostname: test02
        ostemplate: "local:vztmpl/debian-12-standard_12.7-1_amd64.tar.zst"
        storage: "local-lvm"
        cores: 1
        memory: 1024
        swap: 512
        disk: "local-lvm:25"
        net: "name=eth0,bridge=vmbr0,ip=dhcp"
        password: "containerpassword"
        state: present
When you run this playbook, Ansible will loop through your container definitions. It will delete the container where state is set to absent (in this case, test01) and create a container where state is set to present (here, test02).
Here’s an example of the expected output:
PLAY [Manage Proxmox LXC containers] *****************************************************************************************************************************************************

TASK [Process each LXC container] ********************************************************************************************************************************************************
included: proxmox_lxc for localhost => (item={'vmid': 110, 'hostname': 'test01', 'ostemplate': 'local:vztmpl/debian-12-standard_12.7-1_amd64.tar.zst', 'storage': 'local-lvm', 'cores': 1, 'memory': 1024, 'swap': 512, 'disk': 'local-lvm:25', 'net': 'name=eth0,bridge=vmbr0,ip=dhcp', 'password': 'containerpassword', 'state': 'absent'})
included: proxmox_lxc for localhost => (item={'vmid': 111, 'hostname': 'test02', 'ostemplate': 'local:vztmpl/debian-12-standard_12.7-1_amd64.tar.zst', 'storage': 'local-lvm', 'cores': 1, 'memory': 1024, 'swap': 512, 'disk': 'local-lvm:25', 'net': 'name=eth0,bridge=vmbr0,ip=dhcp', 'password': 'containerpassword', 'state': 'present'})

TASK [proxmox_lxc : Run creation tasks if state is present] ******************************************************************************************************************************
skipping: [localhost]

TASK [proxmox_lxc : Run deletion tasks if state is absent] *******************************************************************************************************************************
included: /home/demo/ansible/roles/proxmox_lxc/tasks/delete.yml for localhost

TASK [proxmox_lxc : Delete LXC container on Proxmox] *************************************************************************************************************************************
changed: [localhost]

TASK [proxmox_lxc : Run creation tasks if state is present] ******************************************************************************************************************************
included: /home/demo/ansible/roles/proxmox_lxc/tasks/create.yml for localhost

TASK [proxmox_lxc : Create LXC container on Proxmox] *************************************************************************************************************************************
changed: [localhost]

TASK [proxmox_lxc : Run deletion tasks if state is absent] *******************************************************************************************************************************
skipping: [localhost]

PLAY RECAP *******************************************************************************************************************************************************************************
localhost                  : ok=6    changed=2    unreachable=0    failed=0    skipped=2    rescued=0    ignored=0
Abstracting the LXC Data#
Instead of hardcoding our list of LXCs directly in the playbook, it’s a good idea to store that data in a separate file. This way, you can make changes without editing your playbooks directly. Create a file called lxcs.yml in the vars/ directory and add the following content:
# List of managed LXC containers
lxcs:
  - vmid: 110
    hostname: test01
    # Your OS template for the LXC
    ostemplate: "local:vztmpl/debian-12-standard_12.7-1_amd64.tar.zst"
    storage: "local-lvm" # Storage volume
    cores: 1             # Number of vCPU cores
    memory: 1024         # Memory in MB
    swap: 512            # Swap in MB
    disk: "local-lvm:25" # Storage volume name and size in GB
    net: "name=eth0,bridge=vmbr0,ip=dhcp"
    password: "containerpassword"
    state: absent # Remove the container
  - vmid: 111
    hostname: test02
    ostemplate: "local:vztmpl/debian-12-standard_12.7-1_amd64.tar.zst"
    storage: "local-lvm"
    cores: 1
    memory: 1024
    swap: 512
    disk: "local-lvm:25"
    net: "name=eth0,bridge=vmbr0,ip=dhcp"
    password: "containerpassword"
    state: absent
Note: I set the state of the second test container to absent because I intend to destroy it.
Now, update your playbook so it loads both the vault and the LXC definitions. The playbook should look like this:
---
- name: Manage Proxmox LXC containers
  hosts: localhost
  connection: local
  gather_facts: no

  # Load credentials and LXC definitions
  vars_files:
    - ../vars/proxmox-vault.yml
    - ../vars/lxcs.yaml

  tasks:
    - name: Process each LXC container
      include_role:
        name: proxmox_lxc
      loop: "{{ lxcs }}"
      loop_control:
        loop_var: container
Run your playbook again to test it out.
Closing#
That concludes part one of my foray into Proxmox Ansible automation. In part two, I’ll fine-tune the playbook and tasks further, and also automate the setup, configuration, and software installations on some VMs.
GitHub#
Download these files on my GitHub. More updates to come.